NodeJS Login and Registration Rest API with MongoDB
In this tutorial, I will explain to you the complete process of creating a user registration and login system where users can create an account by providing name, username, email, and password, log in using NodeJS and MongoDB. I will help you how to create step by step register login and API in NodeJS and MongoDB.
Before started to implement the NodeJS Login and Registration Rest API, look files structure:
- node-js-login-registration-rest-api-mongodb
- application
- config
- config.js
- db.js
- error-handler.js
- jwt.js
- models
- user.model.js
- controllers
- users.controller.js
- service
- user.service.js
- config
- node_modules
- server.js
- package.json
- package-lock.json
- application
Step 1 – Install express, express-jwt, cors, mongoose,rootpath and dotenv Modules
  // execute command
  npm install
  npm install express --save
  npm install express-jwt --save
  npm install cors --save
  npm install mongoose --save
  npm install rootpath --save
  npm install dotenv --save
Step 2 – Create file named config.js
   // Database and loal runtime variable
   module.exports = {
      MONGODB_URI: "mongodb://127.0.0.1:27017/webhaunt_DB",
      SECRET: "JWTSuperSecret",
      PORT: 3000,
    };
Step 3 – Connect App to MongoDB
Create a file named db.js inside the folder name “application/config/” and add the following code into it to connect your app to the MongoDB database.
  const config = require('application/config/config');
  const mongoose = require('mongoose');
  const URI = process.env.MONGODB_URL;
  mongoose.connect(process.env.MONGODB_URI || config.MONGODB_URI, { useUnifiedTopology: true }
  );
  const connection = mongoose.connection;
  connection.once('open', () => {
      console.log("MongoDB database connection established successfully");
  } )

  module.exports = {
      User: require('application/models/user.model')
  };
Step 4 – Global Error Handler Middleware
Global Error Handler, It is configured as middleware in the server.js
    module.exports = errorHandler;

    function errorHandler(err, req, res, next) {
        if (typeof (err) === 'string') {
            // custom application error
            return res.status(400).json({ message: err });
        }

        if (err.name === 'ValidationError') {
            // mongoose validation error
            return res.status(400).json({ message: err.message });
        }

        if (err.name === 'UnauthorizedError') {
            // jwt authentication error
            return res.status(401).json({ message: 'Invalid Token' });
        }

        // default to 500 server error
        return res.status(500).json({ message: err.message });
    }
Step 5 – JWT token Middleware
JWT middleware checks that the JWT token received in the http request from the client side is valid before allowing access to the web API.
    const expressJwt = require('express-jwt');
    const config = require('application/config/config');
    const userService = require('application/service/user.service');

    module.exports = jwt;

    function jwt() {
        const secret = config.SECRET;
        return expressJwt({ secret, algorithms: ['HS256'], isRevoked }).unless({
            path: [
                // public routes that don't require authentication
                '/users/login',
                '/users/register'
            ]
        });
    }

    async function isRevoked(req, payload, done) {
        const user = await userService.getById(payload.sub);

        // revoke token if user no longer exists
        if (!user) {
            return done(null, true);
        }

        done();
    };
Step 6 – Create Models
Create a file named user.model.js inside the folder name “application/models/” and add the following code
    const mongoose = require('mongoose');
    const Schema = mongoose.Schema;

    const schema = new Schema({
        username: { type: String, unique: true, required: true },
        hash: { type: String, required: true },
        firstName: { type: String, required: true },
        lastName: { type: String, required: true },
        email: { type: String, required: true },
        createdDate: { type: Date, default: Date.now }
    });

    schema.set('toJSON', {
        virtuals: true,
        versionKey: false,
        transform: function (doc, ret) {
            delete ret._id;
            delete ret.hash;
        }
    });

    module.exports = mongoose.model('User', schema);
Step 7 – Create controllers
Create a file named users.controller.js inside the folder name “application/controllers/” and add the following code
    const express = require('express');
    const router = express.Router();
    const userService = require('application/service/user.service');

    // declare routes
    router.post('/login', authenticate);
    router.post('/register', register);
    router.get('/', getAll);
    router.get('/current', getCurrent);
    router.get('/:id', getById);
    router.put('/:id', update);
    router.delete('/:id', _delete);

    module.exports = router;

    function authenticate(req, res, next) {
        userService.authenticate(req.body)
            .then(user => user ? res.json(user) : res.status(400).json({ message: 'Username or password is incorrect' }))
            .catch(err => next(err));
    }

    function register(req, res, next) {
        userService.create(req.body)
            .then(() => res.json({}))
            .catch(err => next(err));
    }

    function getAll(req, res, next) {
        userService.getAll()
            .then(users => res.json(users))
            .catch(err => next(err));
    }

    function getCurrent(req, res, next) {
        userService.getById(req.user.sub)
            .then(user => user ? res.json(user) : res.sendStatus(404))
            .catch(err => next(err));
    }

    function getById(req, res, next) {
        userService.getById(req.params.id)
            .then(user => user ? res.json(user) : res.sendStatus(404))
            .catch(err => next(err));
    }

    function update(req, res, next) {
        userService.update(req.params.id, req.body)
            .then(() => res.json({}))
            .catch(err => next(err));
    }

    function _delete(req, res, next) {
        userService.delete(req.params.id)
            .then(() => res.json({}))
            .catch(err => next(err));
    }
Step 8 – Create service
Create a file named user.service.js inside the folder name “application/service/” and add the following code. User service contains the core business logic for user authentication and management.
    const config = require('application/config/config');
    const jwt = require('jsonwebtoken');
    const bcrypt = require('bcryptjs');
    const db = require('application/config/db');
    const User = db.User;

    module.exports = {
        authenticate,
        getAll,
        getById,
        create,
        update,
        delete: _delete
    };

    async function authenticate({ username, password }) {
        const user = await User.findOne({ username });
        if (user && bcrypt.compareSync(password, user.hash)) {
            const token = jwt.sign({ sub: user.id }, config.SECRET, { expiresIn: '7d' });
            return {
                ...user.toJSON(),
                token
            };
        }
    }

    async function getAll() {
        return await User.find();
    }

    async function getById(id) {
        return await User.findById(id);
    }

    async function create(userParam) {
        // validate
        if (await User.findOne({ username: userParam.username })) {
            throw 'Username "' + userParam.username + '" is already taken';
        }

        const user = new User(userParam);

        // hash password
        if (userParam.password) {
            user.hash = bcrypt.hashSync(userParam.password, 10);
        }

        // save user
        await user.save();
    }

    async function update(id, userParam) {
        const user = await User.findById(id);

        // validate
        if (!user) throw 'User not found';
        if (user.username !== userParam.username && await User.findOne({ username: userParam.username })) {
            throw 'Username "' + userParam.username + '" is already taken';
        }

        // hash password if it was entered
        if (userParam.password) {
            userParam.hash = bcrypt.hashSync(userParam.password, 10);
        }

        // copy userParam properties to user
        Object.assign(user, userParam);

        await user.save();
    }

    async function _delete(id) {
        await User.findByIdAndRemove(id);
    }
Step 9 – Start App Server
It is configures application middleware, binds controllers to routes and starts the Express web server for the API.
    require('rootpath')();
    const express = require('express');
    const app = express();
    const cors = require('cors');
    const jwt = require('application/config/jwt');
    const errorHandler = require('application/config/error-handler');

    // parse requests of content-type - application/x-www-form-urlencoded
    app.use(express.urlencoded({ extended: true }));

    // parse requests of content-type - application/json
    app.use(express.json());

    app.use(cors());

    // for JWT auth to secure the api
    app.use(jwt());

    // api routes
    app.use('/users', require('application/controllers/users.controller'));

    // Error handler
    app.use(errorHandler);

    // set port, listen for requests
    const PORT = Number(process.env.PORT || 3000);

    const server = app.listen(PORT, function () {
        console.log('Server listening on port ' + PORT);
    });
Finally, We will run the application with help of the postman
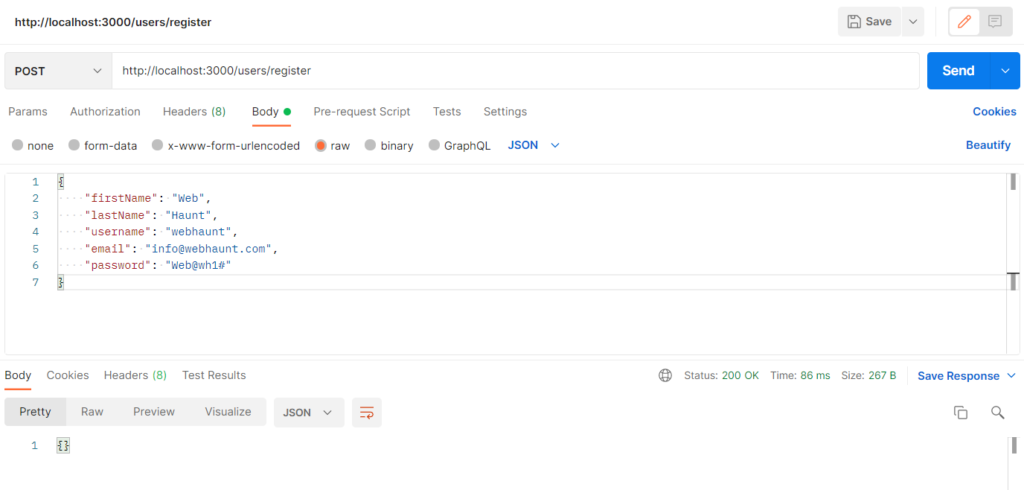
1-Register using POST method
    // register json
    // POST Method: http://localhost:3000/users/register
    {
        "firstName": "Web",
        "lastName": "Haunt",
        "username": "webhaunt",
        "email": "info@webhaunt.com",
        "password": "Web@wh1#"
    }
Output
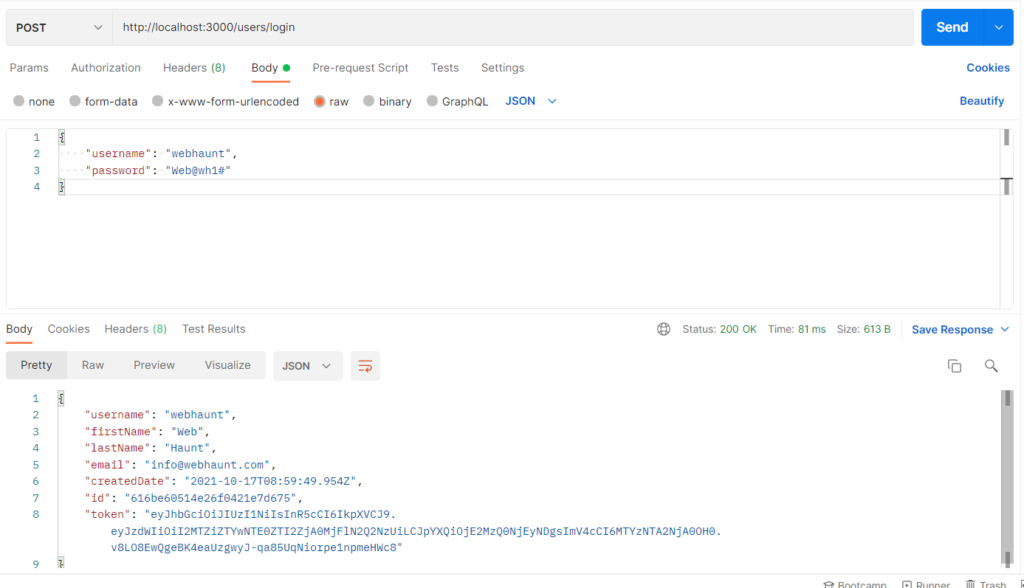
2-Login using POST method
    // login json
    // POST Method: http://localhost:3000/users/login
    {
        "username": "webhaunt",
        "password": "Web@wh1#"
    }
    // login response
    {
        "username": "webhaunt",
        "firstName": "Web",
        "lastName": "Haunt",
        "email": "info@webhaunt.com",
        "createdDate": "2021-10-17T08:59:49.954Z",
        "id": "616be60514e26f0421e7d675",
        "token": "eyJhbGciOiJIUzI1NiIsInR5cCI6IkpXVCJ9.eyJzdWIiOiI2MTZiZTYwNTE0ZTI2ZjA0MjFlN2Q2NzUiLCJpYXQiOjE2MzQ0NjEyNDgsImV4cCI6MTYzNTA2NjA0OH0.v8LO8EwQgeBK4eaUzgwyJ-qa85UqNiorpe1npmeHWc8"
    }
Output
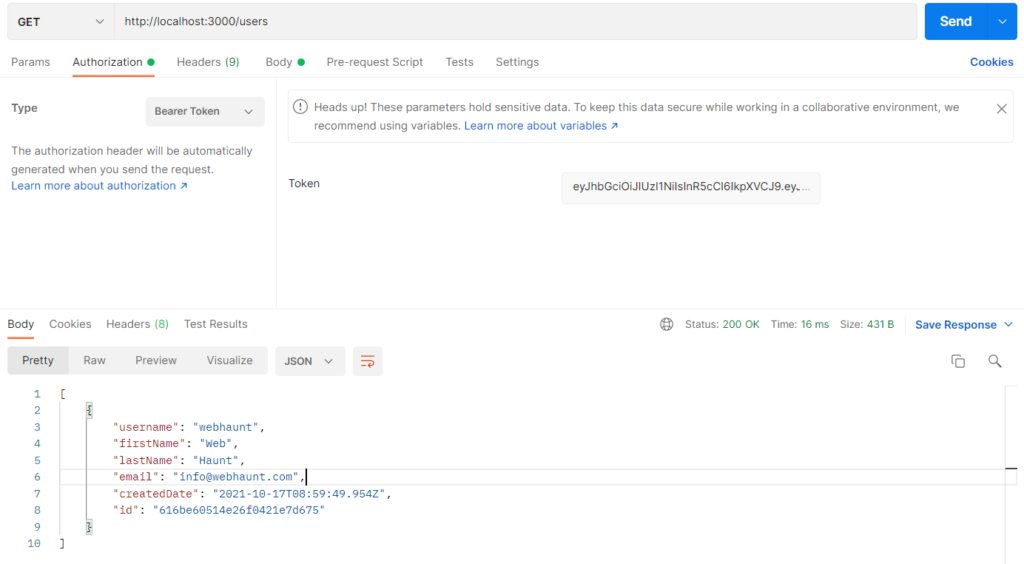
3-Get All Users using GET method
    // get all users details
    // GET Method: http://localhost:3000/users
    [
        {
            "username": "webhaunt",
            "firstName": "Web",
            "lastName": "Haunt",
            "email": "info@webhaunt.com",
            "createdDate": "2021-10-17T08:59:49.954Z",
            "id": "616be60514e26f0421e7d675"
        }
    ]
Output
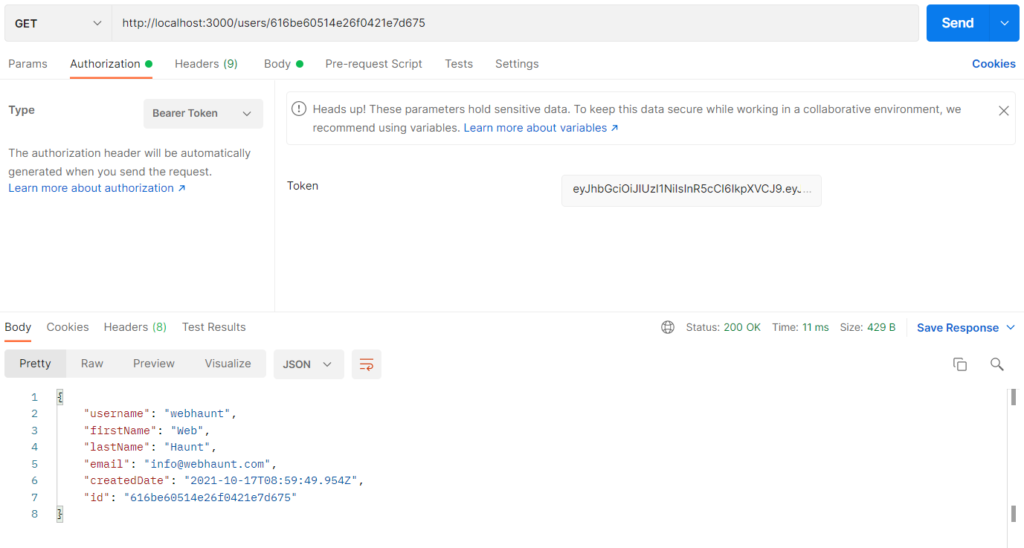
4-Get User using GET method
    // get single user details
    // GET Method: http://localhost:3000/users/616be99214e26f0421e7d67e
    {
        "username": "webhaunt",
        "firstName": "Web",
        "lastName": "Haunt",
        "email": "info@webhaunt.com",
        "createdDate": "2021-10-17T08:59:49.954Z",
        "id": "616be60514e26f0421e7d675"
    }
Output
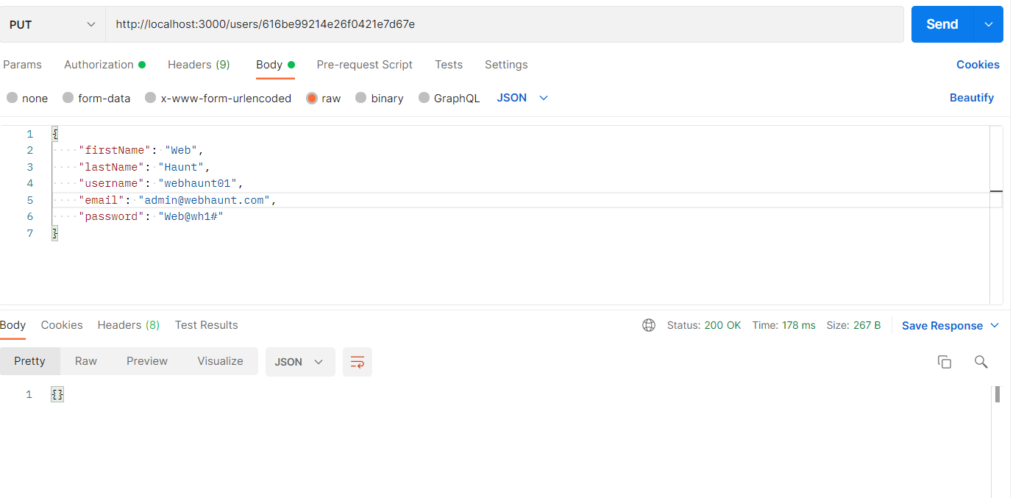
5-Update User using PUT method
    // update user
    //PUT Method: http://localhost:3000/users/616be99214e26f0421e7d67e
    {
        "firstName": "Web",
        "lastName": "Haunt",
        "username": "webhaunt01",
        "email": "admin@webhaunt.com",
        "password": "Web@wh1#"
    }
Output
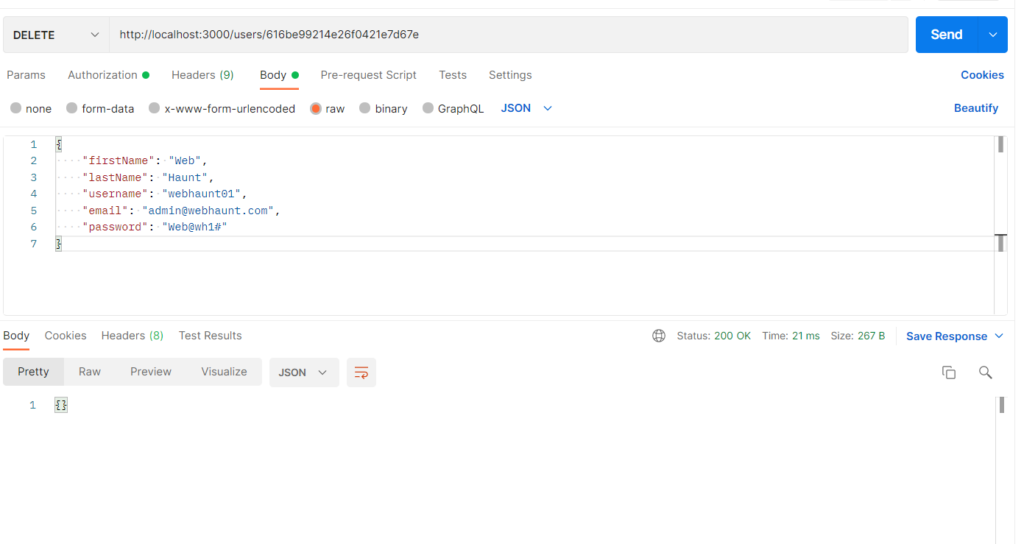
6-Delete User using DELETE method
    // delete user
    // DELETE Method: http://localhost:3000/users/616be99214e26f0421e7d67e
Output
